Adding & Editing Tools
Overview
The Tool Library is the heart of ProBitManager, allowing you to catalog and manage all your cutting tools in one centralized location. This guide will walk you through adding tools manually, one at a time, with all the details needed for effective tool management.
Quick Tip
If you have many tools to add, consider using the Bulk Import feature to save time.
Prerequisites
- Active ProBitManager account (Free or Pro)
- Tool specifications (diameter, flutes, material, etc.)
- Optional: Tool images for visual identification
- Optional: Manufacturer part numbers and pricing
Step-by-Step Guide
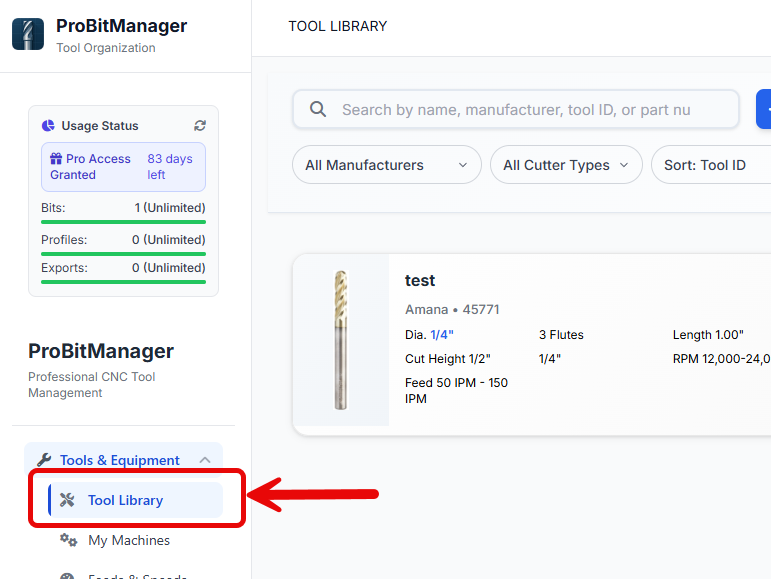
Step 1: Access the Tool Library
Navigate to your Tool Library by clicking on "Dashboard" in the main navigation menu, or use the keyboard shortcut Ctrl + T.

Step 2: Click "Add New Tool"
Click the green "Add New Tool" button located at the top right of the tool library page. You can also use Ctrl + N to quickly open the add tool form.
Step 3: Enter Basic Information
Fill in the essential tool information:
Required Fields:
- Tool Name
- A descriptive name for easy identification (e.g., "1/4" 2-Flute Carbide Endmill")
- Tool Type
- Select from: End Mill, Ball Nose, V-Bit, Drill, Face Mill, etc.
- Diameter
- Cutting diameter in inches or mm (auto-converts between units)
- Number of Flutes
- Number of cutting edges (typically 1-6 for end mills)
- Material
- HSS, Carbide, Cobalt, Coated Carbide, etc.
Pro Tip
Use consistent naming conventions for your tools. For example: "[Diameter] [Flutes]F [Material] [Type]" → "0.25 2F Carbide EM"
Step 4: Add Advanced Specifications (Optional)
For more detailed tracking, fill in additional specifications:
Geometry Details
- • Overall Length (OAL)
- • Length of Cut (LOC)
- • Shank Diameter
- • Corner Radius
- • Helix Angle
Manufacturer Info
- • Manufacturer Name
- • Part Number
- • Purchase Price
- • Supplier
- • Purchase Date
Step 5: Upload Tool Image (Recommended)
Add an image to help visually identify your tool. This is especially helpful when you have similar tools.
Image Guidelines:
- • Supported formats: JPG, PNG, WebP
- • Recommended size: 800x800 pixels
- • Maximum file size: 5MB
- • Clear, well-lit photo on neutral background
Step 6: Set Storage Location
Specify where this tool is stored in your shop for easy retrieval:
- Drawer/Cabinet: Main storage location (e.g., "Drawer 3")
- Position: Specific slot or holder number
- Quantity: How many of this tool you have
- Status: Active, Worn, Broken, or Retired
Step 7: Add Notes and Tags
Include any additional information that might be helpful:
Notes Examples:
- • "Best for aluminum, use with mist coolant"
- • "Reserved for finishing passes only"
- • "Do not exceed 8000 RPM"
Tag Examples:
Step 8: Save Your Tool
Review all the information you've entered, then click the "Save Tool" button. Your tool will be immediately added to your library and available for use in feeds & speeds calculations.
Important
Make sure to save your tool before navigating away from the page. Unsaved changes will be lost.
Tips & Best Practices
Use Consistent Naming
Develop a naming system and stick to it. This makes searching much easier.
Take Photos Before Installing
Photograph new tools before first use for the clearest reference images.
Track Purchase Information
Recording price and supplier helps with reordering and cost analysis.
Use Tags Liberally
Tags make it easy to find tools for specific materials or operations.
Update Status Regularly
Mark tools as worn or broken to avoid using them accidentally.
Common Issues
Image upload fails
Check that your image meets these requirements:
- File size under 5MB
- Format is JPG, PNG, or WebP
- Not corrupted (try opening in an image viewer)
If problems persist, try converting the image to JPG format.
Can't find tool type in dropdown
If your specific tool type isn't listed, choose the closest match and add details in the notes field. Pro users can request custom tool types through support.
Metric/Imperial conversion issues
ProBitManager automatically converts between units. Enter values with units (e.g., "6mm" or "0.25in") and they'll be converted automatically. The system stores everything in decimal inches internally.